The Day My Laptop Almost Melted (And Why Yours Might Be Next)
Have you ever been right in the middle of typing an email when your laptop suddenly sounds like a jet engine taking off? That was me last Tuesday, right before my screen went pitch black. It turns out, you do not need to be a tech wizard to fix this—you just need ten minutes, a small screwdriver, and a little bit of patience. Let me show you how I brought my computer back to life without spending a dime.
I sat there in total silence, staring at a blank screen, terrified that I had just lost hours of hard work. The worst part was the intense feeling of helplessness. I honestly thought my expensive computer was dead forever because I didn't realize how much dust had secretly built up inside. That sudden panic attack taught me a massive lesson about keeping internal computer components clean.
This hidden thermal issue silently destroys your mental peace. You constantly worry if your machine will survive the next video call or if it will crash during an important presentation. We spend so much money on these premium devices, yet a tiny buildup of household dust can turn them into useless plastic bricks.
Quick Fix Checklist (What You Will Learn Today)
- How to safely open your laptop without breaking any plastic clips.
- The exact tools you need (and why you should never use a household vacuum).
- My step-by-step method to clean the fan blades and hidden exhaust vents.
- Simple daily habits to keep dust away and make your battery last longer.
Your Hands-On Blueprint for a Cooler, Faster Machine
Many people get highly intimidated by the thought of opening up their electronics. We often believe that only certified technicians can handle internal computer maintenance. However, the reality is much simpler than you might think.
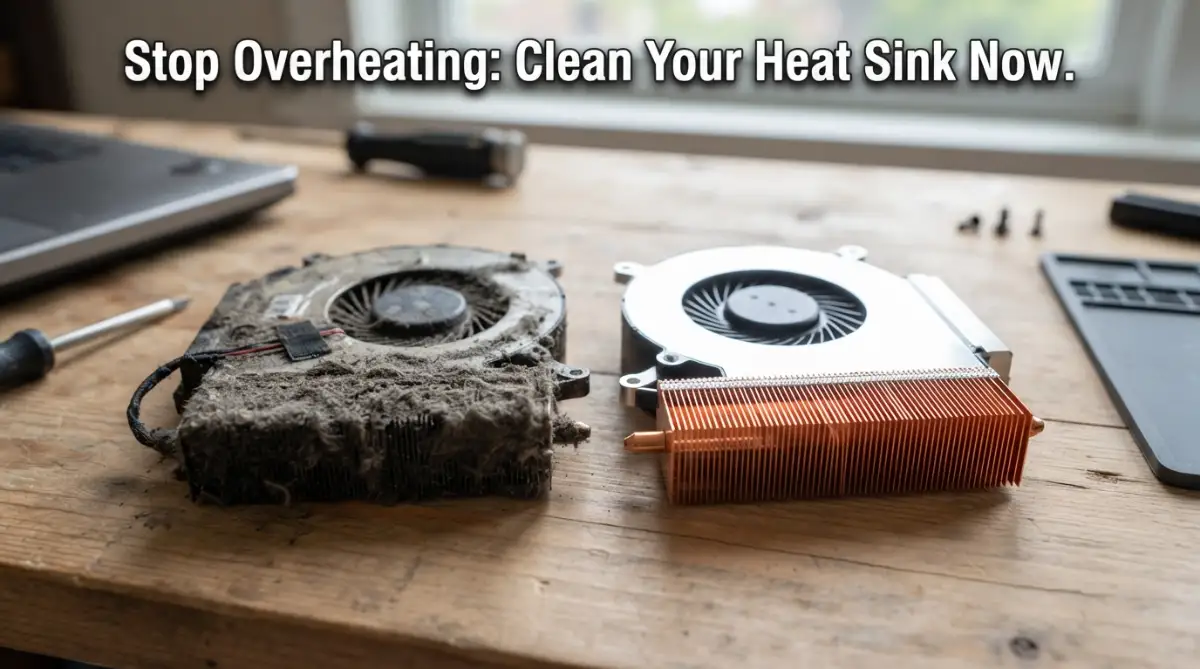
By understanding exactly how your cooling system works, you can easily take control of your device's health. Think of your heat sink as the lungs of your computer. When those tiny metal fins get clogged with pet hair, dead skin cells, and regular room dust, the system literally cannot breathe.
Let us look at a clear, step-by-step breakdown to rescue your machine from a fiery end. I promise you can do this right on your kitchen table with just a little patience.
Gathering the Right Rescue Tools
Before you even touch a single screw, you need to prepare your workspace properly. Working on a cluttered desk is a guaranteed way to lose tiny, important parts. Clear off a large, flat table and grab a soft towel to rest your device on.
You do not need a massively expensive toolkit for this job. A simple, high-quality precision screwdriver set is your best friend here. Most standard devices use small Phillips head screws, while some premium models require tiny Torx screwdrivers.
Next, you will need a fresh can of compressed air, which you can find at any local office supply store. Never use a traditional vacuum cleaner on your computer internals. Vacuums create massive amounts of static electricity that can instantly kill your motherboard.
Finally, grab some soft cotton swabs and a small bottle of high-percentage isopropyl alcohol. These will help you gently lift away stubborn grime that the air cannot blow away. Having a small magnetic tray or even a simple ice cube tray is brilliant for keeping your screws organized.
The Safe Power-Down Sequence
Safety must always come first when handling exposed circuit boards. Start by completely shutting down your operating system. Do not just close the lid and put it to sleep; select the actual shut-down command.
Once the screen is dark, unplug the main power cable from the wall. Disconnect any USB drives, external mice, or extra monitors you have plugged into the side ports. If your specific model has a removable battery on the bottom, take it out right now.
If your battery is built inside the casing, you will need to disconnect it internally as soon as you remove the bottom cover. Press and hold your power button for about fifteen seconds after everything is unplugged. This clever little trick drains any leftover electricity hiding inside the internal capacitors.
Cracking Open the Outer Shell
Now comes the part that makes most beginners sweat. Flip your device upside down onto your soft towel so the bottom cover is facing you. Take a quick picture of the bottom with your phone so you remember exactly where everything belongs.
Slowly start removing the screws around the outer edges. Place them carefully into your organizer tray. Pay close attention, because some manufacturers use different length screws in different holes.
Pro Tip: The first time I tried opening my device, I completely missed a hidden screw tucked under a small rubber foot pad. If the back cover feels stuck, never force it or bend the plastic; simply stop and look for a hidden screw hiding under a sticker or rubber grip.
Once all the fasteners are out, grab an old plastic guitar pick or a credit card. Gently slide it along the seam where the bottom cover meets the keyboard deck. You will hear small popping sounds as the plastic holding clips release their grip.
Tackling the Dusty Cooling Fan
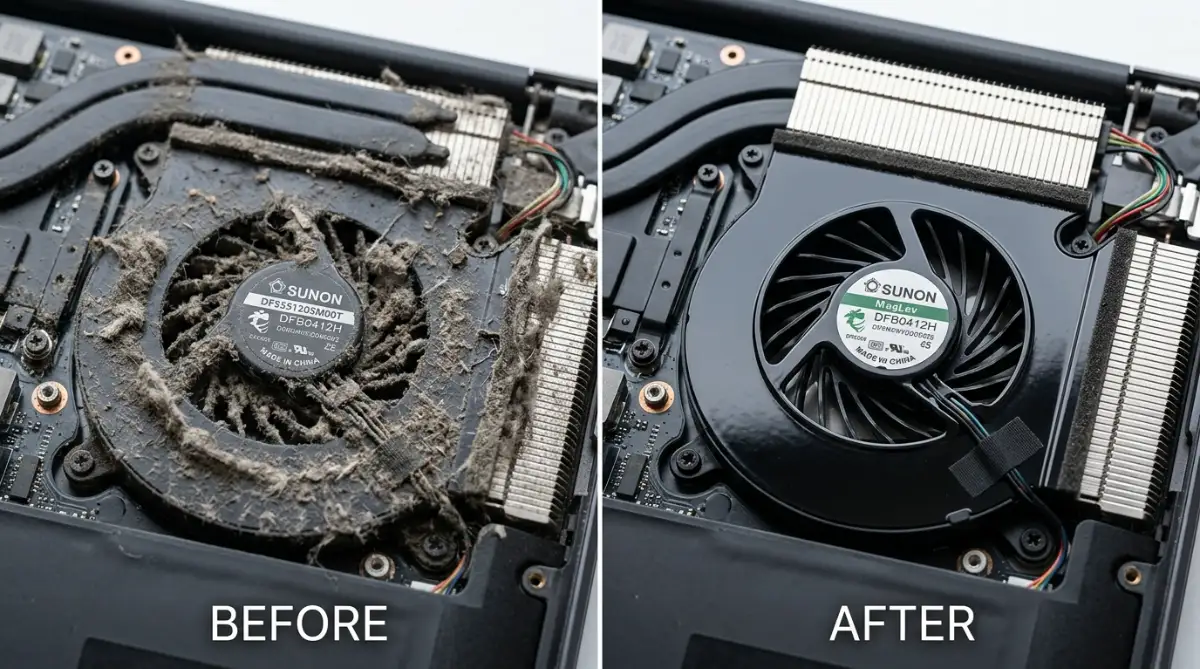
With the bottom cover successfully removed, you will immediately see the cooling fan. It usually looks like a small black circle with delicate plastic blades. Depending on how long you have owned the machine, it might be covered in a thick gray blanket of fuzz.
Before you start spraying air everywhere, you must secure those tiny blades. Never let compressed air spin the fan freely. The forced air will make the blades spin much faster than they were designed to, which can completely shatter the delicate internal bearings.
Gently hold the fan blades in place with your finger or a soft cotton swab. Hold your compressed air can perfectly upright. If you tilt the can upside down, it will spray freezing liquid onto your sensitive electronics.
Give the fan a few short, controlled bursts of air to knock the loose dirt loose. For the sticky dust clinging to the edges of the blades, dip a cotton swab lightly into your isopropyl alcohol. Very gently wipe each individual blade until the plastic looks brand new again.
Watch Exactly How It is Done
If you are a visual learner, seeing someone else perform this exact technique can wipe away all your anxiety. Check out this brilliant demonstration of safe dust removal right below.
Clearing the Heat Sink Airways
The fan alone is only half of the cooling puzzle. Right next to it, you will see a copper pipe leading to a small metal grill. This grill is the actual heat sink, and it is usually the biggest victim of dust blockages.
When your computer gets hot, that heat travels down the copper pipe to the metal fins. The fan is supposed to push cool room air through those fins to carry the heat outside. If a wall of dust is blocking the fins, the heat gets trapped inside and aggressively cooks your processor.
Aim your compressed air nozzle from the outside of the laptop casing, pointing inward through the exhaust vents. This pushes the trapped dust bunny back toward the fan area where you can easily pick it up. Give it several firm blasts from different angles until you can see clear daylight through the tiny metal gaps.
Myth Vs Reality: Computer Cleaning
There are so many bad rumors floating around about computer maintenance. Let us clear up some dangerous misinformation.
Myth: You can just blow into the vents with your mouth to clean them out.
Reality: Human breath contains heavy moisture and tiny droplets of saliva. Blowing into your electronics introduces water directly onto the circuit board, which can cause terrible short circuits. Always use canned air.
Myth: A cooling pad will fix a deeply clogged system.
Reality: External cooling pads are great for extra airflow, but they cannot push air through a solid wall of dirt. You must manually clean the internal blockage first for a cooling pad to actually help.
Reassembling with Complete Confidence
Once the internal cavity is sparkling clean, it is time to put everything back exactly how you found it. Start by doing a quick visual check of the motherboard. Make sure no loose dust clumps have fallen onto other green circuit areas.
If you disconnected an internal battery cable earlier, gently plug it back into its socket now. Take your clean bottom cover and carefully align it over the exposed machine. Press down firmly but gently around the edges until you hear those satisfying plastic clips snap back into place.
Grab your organized screws and begin returning them to their rightful homes. Do not overtighten them like you are building a bridge. Just turn the screwdriver until it naturally stops; tightening too hard will strip the plastic threads.
Monitoring Your Grand Success
Now comes the most exciting part of the entire process. Plug your main power cable back into the wall and open the screen. Press the power button and listen closely to the beautiful silence.
When you boot up, you will immediately notice that the system feels significantly more responsive. The palm rest under your hands will stay comfortably cool, even when you open heavy programs or watch high-definition videos. Your cooling fan will only turn on when it absolutely needs to, rather than spinning wildly all day long.
You can even download free temperature monitoring software from the internet to check your actual numbers. Seeing your processor happily sitting at a low, safe temperature is incredibly rewarding. You just saved yourself hundreds of dollars and successfully extended the life of your expensive machine for a very long time.
Practicing this simple maintenance routine every few months guarantees your device will always perform beautifully. You now have the exact knowledge and power to protect your digital life from the silent threat of overheating.
Pro-Level Secrets for a Permanently Cool Machine
Now that you have successfully removed the main dust blockage, you might think the job is completely finished. However, keeping your machine running perfectly requires a few smart, daily habits. I want to share some incredibly effective tricks that professional technicians use to keep their personal devices running quietly for years.
Your physical environment plays a massive role in how quickly your system gathers dust. If you have pets like dogs or cats, their fine hair constantly floats through the air and gets sucked directly into your computer vents. To combat this, try keeping your primary workspace in a room with hard floors rather than thick carpets.
You can also significantly reduce airborne particles by understanding the importance of managing indoor dust particles through proper room ventilation. Just opening a window or using an air purifier can stop that heavy dust from ever reaching your expensive electronics.
Another major secret is changing exactly where you place your device while working. We all love watching movies in bed, but resting your computer on a soft mattress or blanket is terrible for its health. The soft fabric completely blocks the bottom intake vents, forcing the fan to work twice as hard while suffocating the entire system.
Always use a flat, solid surface like a wooden desk or a dedicated lap desk. If you want a massive cooling improvement, simply prop up the back of your computer with a small, flat object. Lifting the back edge just half an inch off the table creates a beautiful channel of fresh air that flows straight into the intake grills.
Sometimes, the physical cooling system is perfectly clean, but hidden software is causing the heat. If you have too many hidden programs running invisibly, your processor will constantly run at maximum speed. By learning how to properly manage optimizing background processes, you can instantly stop your fans from spinning aggressively.
For older machines, there is a hidden component that eventually dries out and fails entirely. Between your hot processor and the copper cooling pipe sits a tiny layer of gray paste. Over time, this compound turns into hard, crumbly clay and completely stops transferring heat.
If your fan is perfectly clean but the keyboard still feels like a hot stove, you likely need a paste replacement. You can easily learn the secrets behind why thermal paste is the secret to a cool and fast CPU to take your system maintenance to the absolute highest level.
Quick Fact-Check: Do I really need new thermal paste?
You might be wondering if changing that gray paste is actually worth the effort.
- The Myth: You need to change your thermal paste every single year.
- The Fact: High-quality factory paste easily lasts 3 to 5 years. I only replace mine if my laptop shuts down from heat after I have completely cleaned the dust out of the fans. Do not stress about it if your newly cleaned fan keeps everything cool!
Finally, I highly recommend downloading a free, trusted temperature monitoring program from the internet. These lightweight tools sit quietly on your screen and show you exactly how hot your components are getting in real-time. By keeping an eye on these numbers, you can catch a tiny heat issue before it turns into a massive hardware failure.
Professional gamers and developers constantly track internal system temperatures to ensure their devices are not thermal throttling. If you notice the numbers slowly creeping up over a few months, you will know exactly when it is time to grab your screwdriver again.

The Heartbreaking Mistakes That Destroy Laptops
Cleaning your personal electronics is extremely rewarding, but a few simple mistakes can lead to absolute disaster. I have seen so many people accidentally destroy a thousand-dollar machine because they skipped one tiny safety rule. The most heartbreaking part is that these fatal errors are completely preventable.
The most common and destructive mistake is using a household vacuum cleaner to suck dust out of the vents. It seems like a brilliant, fast idea, but it is actually a death sentence for your computer. The plastic hose of a vacuum cleaner generates massive amounts of invisible static electricity as dust rushes through it.
When you touch that highly charged plastic hose to your sensitive metal components, a tiny, invisible spark jumps across the gap. That single spark can instantly fry tiny microchips, leaving you with a completely dead machine. To prevent this nightmare, it is highly recommended to study understanding motherboard hardware and communication so you know exactly what fragile parts you are dealing with.
Another terrible habit is using excessive brute force when trying to open the plastic casing. If the bottom cover does not easily pop off, there is almost certainly a hidden screw you missed. Yanking or bending the plastic will snap the delicate internal clips, leaving your device with ugly, permanent gaps that let dirt pour inside.
When people start turning screws, they often mix them all up in one big pile. Laptop manufacturers use very specific screw lengths for different holes across the board. If you accidentally drive a long screw into a short hole, it will drill straight through the plastic and destroy the delicate internal wires beneath it.
Always use a magnetic mat or an ice cube tray to keep your screws perfectly organized by their location. Taking a few extra seconds to organize your workspace can save you from completely ruining your efforts in making your old computer fast again.
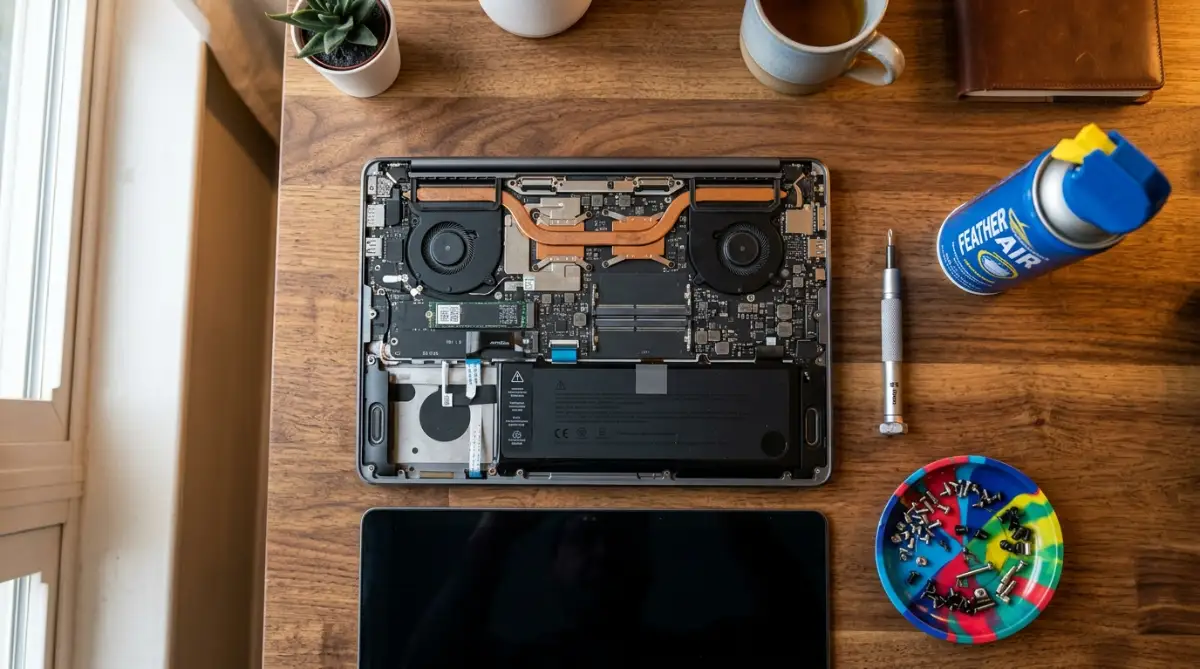
Let us also talk about the extreme danger of letting the internal fan spin wildly. When people buy a can of compressed air, they often spray it directly into the fan blades just to hear them spin super fast. This forces the tiny plastic bearings to rotate far beyond their designed speed limit, completely destroying the internal lubrication.
When you turn the computer back on, that damaged fan will create a horrible, loud rattling noise that will drive you crazy. You will be forced to buy a completely new fan replacement just to fix a totally avoidable mistake. Always hold those fragile blades perfectly still with your finger before applying any air pressure.
Lastly, never spray liquid cleaners, heavy chemicals, or even plain water inside your computer. Even standard rubbing alcohol can cause terrible damage if it drips behind the screen or pools onto the green circuit board. If you must wipe away sticky grime, apply a tiny drop of high-grade isopropyl alcohol to a cotton swab first, and gently wipe only the plastic fan blades.
Always follow safe electronics teardown techniques from trusted repair communities to ensure your personal safety. Taking your time, staying calm, and being gentle are the greatest skills you can develop when working on complex modern technology.
Your Action Plan for a Healthier Device
Taking apart your computer to clean the cooling system might feel a bit scary at first, but the incredible rewards are absolutely worth it. You are taking complete control over your expensive technology instead of letting it slowly choke on daily dust. The massive boost in speed, the beautiful quietness, and the extended lifespan will make you feel like an absolute genius.
Think about how much money you just saved by avoiding an overpriced repair shop or buying a completely new machine. You now understand exactly how your thermal system breathes and exactly what it needs to stay healthy. This simple weekend project is the ultimate way to protect your digital memories, your daily work, and your hard-earned money.
Start by checking your current system temperatures today to see if you actually have a hidden heat problem. Gather your simple tools, clear off a nice clean table, and give yourself plenty of time to carefully work through the steps. You are highly capable of doing this, and your computer will thank you by running beautifully for a very long time.
Why Doing It Yourself Makes Sense (Cost Breakdown)
I used to take my laptop to the shop every time it got loud. Once I realized how easy it is to clean it at home, I saved a ton of cash. Here is a quick look at what you actually save:
I remember how terrified my hands were the very first time I unscrewed my old, overheating laptop. But when I successfully put it back together and heard that beautiful, silent fan, my confidence went straight through the roof. I know you can achieve that exact same satisfying feeling today, so grab your screwdriver and give your machine the fresh air it deserves!
Common Questions About Laptop Cooling
How often should I manually clean my internal fans?
For most normal users, opening your device for a deep physical cleaning every six to eight months is perfectly fine. However, if you have multiple pets, smoke indoors, or work in a highly dusty environment, you should probably check the vents every three months. Keeping a regular schedule prevents the dirt from ever becoming a solid, unmanageable block.
Can a blocked heat sink actually cause my screen to freeze?
Yes, absolutely. Modern processors are programmed to protect themselves by instantly shutting down or heavily slowing down when they reach extreme temperatures. If the heat cannot escape through the dusty vents, the computer will aggressively freeze or crash to prevent literal melting.
Is it safe to use a vacuum cleaner on the outside vents?
No, it is never safe to use a household vacuum on any part of your computer. Vacuums generate high levels of static electricity that can easily travel through the plastic casing and instantly destroy your motherboard. Always stick to clean, anti-static compressed air to push dirt away safely.
Do expensive external cooling pads actually help?
Cooling pads are wonderful for pushing extra fresh air against the bottom plastic of your device, which helps lower overall surface temperatures. However, if your internal heat sink is completely clogged with a wall of dust, a cooling pad cannot magically push air through that solid wall. You must clean the inside first for a cooling pad to be truly effective.
Will opening my bottom cover immediately void my warranty?
This heavily depends on your specific brand and local consumer laws. Many modern companies allow you to easily remove the bottom cover for simple fan cleaning and memory upgrades without penalty. However, always check for tiny "Warranty Void if Removed" stickers over the screw holes just to be completely safe before you start.
Disclaimer: The information provided in this article is for educational and informational purposes only. Opening and modifying personal electronics carries inherent risks, including potential damage to the device or voiding of manufacturer warranties. Always ensure your device is completely powered off and unplugged from the wall before attempting any internal maintenance. The author and publisher are not responsible for any accidental damage, data loss, or physical injury resulting from following these steps. If you feel uncomfortable performing these actions, please seek the help of a certified professional technician.