
The Moment My Camera Screen Went Blank: A Storage Nightmare
You tap the playback button on your camera, expecting to review your shoot, but you get a blank screen and a blunt message: "No Images Found." Before panic sets in, take a breath. Your photos are almost certainly still sitting on that memory card, intact and readable. Let me walk you through how flash storage actually handles deletions, why an empty screen is usually a trick, and the exact steps you must take right now to save your files.
I was sitting on a wooden bench after shooting an entire family reunion, scrolling through hundreds of precious memories. My thumb slipped, the confirmation screen flashed, and within half a second, the screen said "No Images Found."
My hands literally shook as I took the card out and slipped it into my laptop reader. The drive showed up completely empty, displaying zero files and hundreds of gigabytes of free space.
I felt pure panic, convinced that every single smile, candid laugh, and portrait had evaporated into thin air.
If you have ever stared at an empty SD card folder in disbelief, you know this gut-wrenching feeling all too well. It feels like someone walked into your house, took your favorite photo album, and vanished through the back door.
We rely on these tiny plastic chips to hold our most irreplaceable life events, creative client projects, and personal milestones.
Most people assume the card physically erases each photo image by image when you hit delete.
That false assumption causes people to run the wrong recovery commands, reformat the card in frustration, or keep shooting new pictures, which destroys their files forever.
The reality of how memory cards handle deletion is completely different from what your screen shows you.
Once you understand what actually takes place beneath that plastic casing, you will never look at an empty card the same way again.

Essential Takeaways: Don't Panic, Act Smart
-
Photos Don't Vanish Instantly: Pressing "Delete" only removes the index pointer; your actual photo data stays on the chip until new data overwrites it.
-
Stop Shooting Immediately: Taking even a single test shot triggers wear-leveling algorithms that can permanently crush your deleted files.
-
Format Inside Your Camera: When preparing clean cards for new projects, always format them inside your camera body, never via generic PC format utilities.
-
Avoid Generic Fixes: Never run automatic repair tools like chkdsk on an unbacked-up card, as they often purge broken headers instead of saving them.
The Invisible Library: How SD Cards Track Your Files
To understand where your photos go, you have to picture your SD card as a giant reference library.
When you walk into a massive public library, you do not search every single shelf across three floors to find one book. Instead, you check the central card catalog or digital directory at the front desk.
That catalog tells you the exact aisle, shelf number, and slot where your book sits.
Your SD card operates on this exact same principle using something called a File Allocation Table (FAT) or exFAT directory.
Your photos are the heavy physical books sitting on the shelves, while the file allocation table acts as the master index.
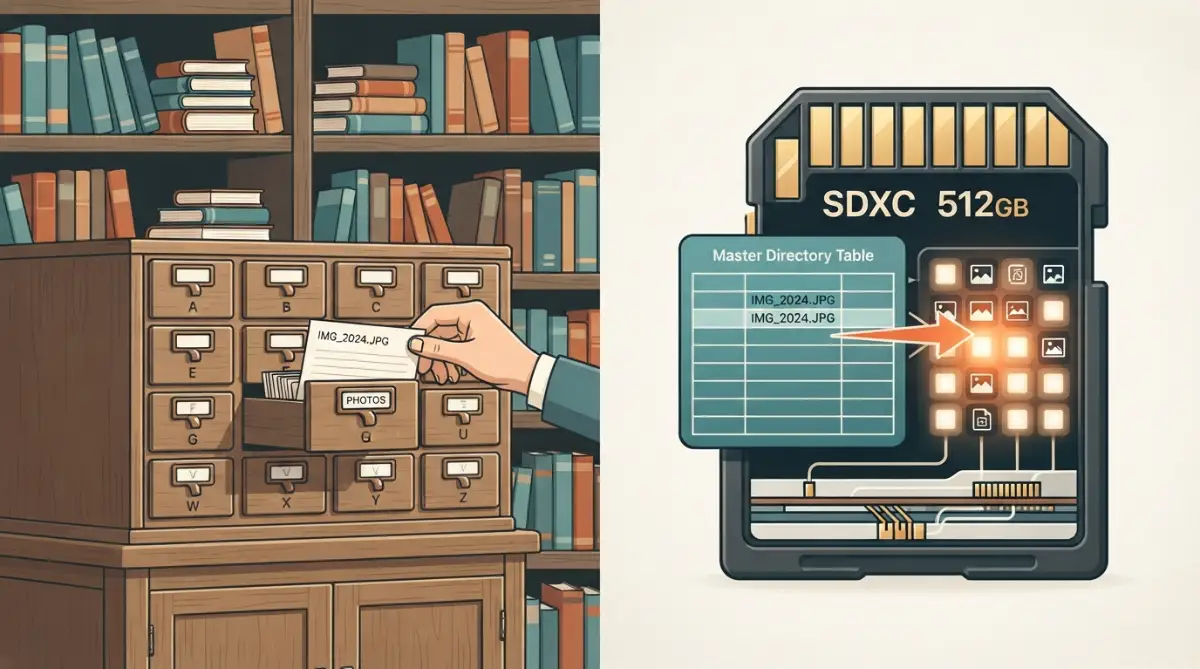
When you take a picture, your camera writes two distinct things onto the card.
First, it places the actual raw image information onto specific storage blocks, called sectors.
Second, it writes an entry in the master index that says, "Photo_001 begins at Sector A and ends at Sector F."
Whenever your phone, laptop, or camera displays your gallery, it is not actually loading the deep storage blocks first. It simply reads the master index list, which happens at lightning speed.
Here is what really happens the second you press delete: your device does not touch the actual photo data at all.
Instead, it simply walks up to the index, pulls out an eraser, and removes the entry for that photo.
It marks that specific slot in the directory as unallocated space, which tells the system that new data can be written there whenever needed.
Because the index entry is gone, your camera operating system assumes there is nothing left to display.
The photos appear to have vanished into thin air, even though the actual binary data is still sitting undisturbed on those microscopic flash cells.
The Electrical Physics of NAND Flash Memory
Beneath the plastic shell of every SD card lies a microchip packed with billions of microscopic microscopic structures called floating-gate transistors.
These tiny components hold electric charges that represent your photos in long sequences of ones and zeroes.
Unlike traditional mechanical hard drives that use spinning magnetic platters, SD cards have zero moving parts.
They rely entirely on trapped electrical charges inside tiny memory cells known as NAND flash memory.
Because moving electrical charges requires precise voltage, writing and erasing data inside flash memory requires a unique sequence of operations.
In flash memory, data can be read and written in small segments called pages, which are typically 4 to 16 kilobytes in size.
However, data cannot be wiped clean in individual pages; it can only be wiped in much larger clusters known as memory blocks.
Each memory block consists of dozens or even hundreds of individual pages grouped together.
If your camera attempted to erase every single transistor whenever you deleted an individual image, the process would take several seconds or even minutes.
It would also drain your camera battery rapidly and wear out the physical chip very quickly.
To save energy, extend card lifespan, and give you an instant response, the system chooses the fastest route possible: it deletes the pointer and leaves the trapped electrical charges untouched.
The image remains physically preserved inside the silicon gates until new data arrives to overwrite it.
Quick Reality Check: File Deletion Myths vs. Facts
-
Myth: Hitting "Delete" wipes the electric charge off the flash chip immediately.
-
Reality: Only the file name and address line are unlinked; the raw photo bytes remain completely frozen in place.
-
Myth: If the camera reads 0 free bytes before, and 64GB free now, the space is physically clean.
-
Reality: The camera merely recalculates available slots based on the directory table, not the physical silicon state.
| Storage Action | What the User Sees | What the File System Does | What the NAND Flash Does |
| Normal Save | New photo appears in gallery | Creates a pointer entry in the directory table | Traps electrical charges into specific pages |
| User Deletes Photo | Photo disappears instantly | Removes the pointer and marks space as free | Leaves electrical charges completely untouched |
| Full Format | Entire card shows empty | Wipes and resets the entire master directory | Leaves raw bits in place (unless zeroed) |
| New Photo Overwrite | New photo saved normally | Assigns free sector pointer to new file | Clears old block voltage and writes new charges |
Why Your Camera Lies to You About Available Space
When you look at your camera display immediately after deleting a batch of pictures, the available shot counter jumps upward.
If it previously said you had space for ten pictures, it might suddenly tell you that you can take fifty.
This gives users the false impression that clean, empty room was physically created on the card.
The camera firmware is simply doing basic math based entirely on the master allocation table.
It checks how many sectors are marked with the "free" flag, calculates the average file size of your chosen resolution, and displays the estimated count.
The camera does not check whether those sectors contain leftover electric charges from your old pictures.
As far as the camera software is concerned, any sector marked as free is ready to receive new information immediately.
This design choice keeps cameras operating smoothly during high-speed burst shooting and high-bitrate video recording.
A photographer shooting sports or wildlife needs the memory card to accept continuous bursts without lag.
If the card stopped to clear out old data bit by bit, the camera buffer would clog up instantly, causing dropped frames and frozen screens.
The immediate disappearance of your deleted photos is actually a built-in speed optimization feature, not a data destruction process.
The Dangerous Threat of Wear Leveling and Overwriting
While your deleted photos remain dormant on the memory cells, their survival window is fragile.
Every single SD card contains a tiny internal computer known as a memory controller.
This controller has one primary job: to make sure the memory card does not burn out unevenly.
Flash memory cells can only handle a finite number of write-and-erase cycles before they degrade physically and fail to hold an electrical charge.
If a camera constantly wrote new data to the exact same physical sectors at the front of the chip, those cells would wear out within months.
To prevent this premature death, the controller uses a background algorithm called wear leveling.
Explore the step-by-step visual breakdown of how memory controllers route data across flash blocks to understand why deleted files stay invisible.
Wear leveling distributes incoming data evenly across the entire surface of the flash chip.

When you snap a new photo after deleting an old one, you cannot predict which physical block the controller will select next.
It might write the new image directly on top of your favorite family picture, permanently destroying that specific sequence of binary code.
Once a new electrical charge is forced into those specific floating gates, the previous data is overwritten.
When true overwriting happens, no software tool in the world can bring the original picture back.
This is why taking even two or three test shots after an accidental deletion can ruin your chances of getting your original photos back.
I learned this lesson the hard way during my early days of photography when I deleted a sequence of landscape shots. I thought taking a couple of quick pictures of my dog would not hurt, but those test shots completely destroyed the exact sectors where my landscape shots were resting. Since then, I always remove the card the second I notice missing files.
Accidental Deletion vs. File System Corruption
Not all vanishing photos are the result of an accidental button press; sometimes the card loses track of them on its own.
Because the file allocation table is modified constantly during read and write cycles, it is sensitive to sudden power loss.
If you pull an SD card out of a card reader while a computer is writing background cache, the master index can split or become unreadable.
The exact same problem happens when your camera battery dies in the middle of saving a photograph.
When the file allocation table gets corrupted, the pointers pointing to your photos break apart.
Your computer will mount the card, pause for a moment, and display a chilling prompt: "The disk needs to be formatted before you can use it."
In this scenario, your photos have not been wiped from the card at all.
The library index has simply lost its pages, leaving the operating system unable to build the directory tree.
The physical files are still sitting quietly in their designated flash sectors, completely intact.
Understanding this distinction gives you peace of mind because it means corruption does not equal permanent destruction.
How Physical Wear and Environmental Damage Play a Role
SD cards are incredibly durable against water and drops because they lack mechanical gears, but they are vulnerable to invisible wear.
The exposed gold contact pins on the back of the card slide against metal connector pins inside your devices every time you plug them in.
Over time, microscopic scratches, pocket lint, skin oils, and oxidation accumulate on these pins.
When an SD card reader fails to get a clean electrical connection with even one data pin, it cannot read the directory structure properly.
The operating system may claim the card is empty or show zero bytes of stored data simply because the communication line is noisy.
Static electricity is another silent killer of flash memory pointers.
Walking across a carpet in dry weather and touching the bare contacts of an SD card can discharge thousands of volts into the internal circuit.
While modern memory controllers feature built-in static protection, strong static spikes can scramble the sectors holding the file index.
When this happens, files seem to vanish instantly without any deletion command ever being issued.
Keeping your cards inside rigid, anti-static plastic cases when not in use is one of the simplest habits to prevent unexpected data disappearance.
Practical Steps to Protect Your Data the Moment Photos Vanish
The instant you notice that photos have disappeared from your SD card, you must change how you handle the card physically and digitally.
Your natural instinct might be to restart your device, reinsert the card multiple times, or run generic repair tools.
Taking the wrong actions in those first five minutes is usually what turns a temporary problem into permanent data loss.
Follow these straightforward rules to keep your underlying data safe:
-
Eject the card immediately: Turn your camera or mobile phone completely off before removing the card so no lingering background tasks try to write cached thumbnails to the storage sectors.
-
Engage the physical write-protect switch: If you are using a full-sized SD card, locate the small plastic sliding switch on the left edge and push it down into the "Lock" position. This physically stops computers from writing new data or index modifications to the card.
-
Never format the card on your device: Even if your camera displays an error screen saying the card is unreadable or empty, never click the format button to fix it, as this creates a fresh directory and complicates recovery.
-
Avoid checking the card on multiple devices: Do not swap the missing card into different cameras or phones to see if they can read it, because every device tries to write its own hidden system folders (like DCIM or Android system caches) the moment the card mounts.
-
Keep the card at room temperature: Do not leave the card inside a hot car or exposed to direct sunlight, as elevated temperatures can accelerate charge leakage in degraded flash memory cells.
Understanding the mechanics of SD card deletion changes how you react to digital emergencies.
The 60-Second Field Protocol:
-
Zero-Power Rule: Power down the camera prior to popping the card latch to prevent residual write spikes.
-
Mechanical Safety Lock: Slide the side tab down until it clicks into the "Lock" notch. MicroSD users should immediately place the card in a locked full-size adapter.
-
Bag It Dry: Put the card in a clean, plastic snap-case away from keys, loose coins, and direct body heat.
Your photos do not vanish into thin air; they simply wait quietly behind the scenes until new data takes their place or a recovery tool reconnects the dots.
Pro-Level Storage Habits to Keep Your Media Intact
Understanding how an SD card writes and marks data is only half the battle.
To keep your files from vanishing without warning, you need proactive habits that protect the card's underlying file table.
Long-term reliability comes down to minimizing sudden power drops and avoiding erratic write interruptions.
The Power of In-Camera Formatting Over Computer Formats
Many people pull an SD card from a camera, connect it to a desktop, and use standard operating system format utilities.
While that wipes the drive, it often creates an allocation unit size that conflicts with your camera's internal buffer logic.
Cameras write media streams using specific block sizes designed to minimize overhead during rapid file creation.
Whenever you prepare a card for a project, always format it inside the specific camera you plan to shoot with.
The camera firmware constructs a file allocation table tailored precisely to its sensor output and processor pipelines.
This simple habit prevents allocation table fragmentation, which is one of the main reasons pointers corrupt and cause images to disappear.
For a deeper look into the physical architecture of solid-state media, check out our breakdown of ssd vs hdd why modern computers can t live without solid state drives.
Practicing Card Rotation to Combat Flash Cell Fatigue
Never rely on a single, massive storage card for months of shooting without cycling it out.
NAND flash memory degrades each time a cell undergoes an electrical erase and write cycle.
If you use one huge card continuously, certain sectors handle constant directory updates while others stay idle.
Carrying three or four medium-capacity cards and rotating them between projects distributes write cycles evenly across all chips.
Professional storage specifications set by the SD Association recommend routine card refreshes to ensure structural integrity across extended operational periods.
Label your cards with simple numbers and cycle through them in a strict numerical sequence.
This keeps you from overworking a single memory controller and reduces the odds of sudden data loss.
Safe Media Ejection and Host Device Communication
Removing a card while background operations are still wrapping up is the quickest way to sever file pointers.
Operating systems frequently delay writes through write-caching, holding data in temporary memory before committing it to physical silicon.
If you pull the card out while the operating system is still finishing index logs, the pointers break instantly.
Always execute a formal software eject on your computer before physically pulling the card from the reader slot.
On cameras, wait until the blinking activity light turns off completely before popping open the card door.
These tiny precautions ensure that every pointer entry closes cleanly in the master directory table.
If you suspect your deleted pictures are still trapped on an intact flash surface, follow our detailed walkthrough on how to recover deleted photos from sd card the complete safe guide.
The Golden 3-2-1 Media Protection Rule
Flash memory is an active workspace, not a long-term digital vault.
As soon as a shoot wraps up, move your files off the portable card and into a reliable storage array.
The industry gold standard for preserving digital work is the 3-2-1 framework.
Keep three total copies of your photos across two distinct storage formats, with at least one offsite backup.
Once your pictures exist safely on a local drive and an offsite repository, clearing your SD card carries zero emotional stress.
To explore modern offsite methods, read our comprehensive review of cloud storage explained everything you need to know today.

Destructive Mistakes People Make When Photos Vanish
When photos suddenly disappear, fear and panic often cause people to make bad decisions.
In a frantic attempt to get their memories back, users rush through random fixes they find online.
Unfortunately, these hasty reactions are usually what turn a recoverable directory issue into permanent data destruction.
For a complete list of recovery mistakes that can make deleted photos harder or impossible to recover, see our guide on SD card recovery mistakes you should avoid.
Taking New Photos to "Test" the Card
This is easily the most common and devastating mistake made by everyday users.
Someone opens their camera playback screen, sees nothing, and snaps three quick pictures of their shoe or floor to test the card.
As explained in Part 1, the memory controller views all unindexed blocks as open territory.
Those test pictures get written across unallocated space, often trampling right over the deleted files.
Once fresh data overwrites those physical floating-gate transistors, the original images are gone forever.
If your photos disappear, freeze what you are doing, take the card out, and do not capture another frame.
For scientific insight into what happens during this process, review our analysis on can permanently deleted photos be recovered here is what science says.
Installing Shady Recovery Software Directly onto the Memory Card
Another common blunder occurs when people search the internet for quick data fixes.
They download sketchy freeware programs and choose the troubled SD card as the installation destination or output folder.
Installing any program onto the affected card writes hundreds of temporary installation files across the storage sectors.
Similarly, telling recovery tools to save found files onto the exact same card ruins the remaining data blocks.
Always install utility software on your computer's main internal hard drive.
Set the destination folder for extracted files to your computer desktop or an external backup drive.
Trusting Generic Windows or Mac Disk Repair Utilities
When a file system scrambles, computers often pop up an alert offering to scan and repair the drive.
Tools like Windows CheckDisk (chkdsk) or Mac First Aid are built to restore operating system functionality, not preserve your photos.
These native utilities scan the directory tree, spot orphaned fragments, and truncate or strip them away to make the disk mountable again.
During that aggressive repair process, partially broken photo headers get stripped and permanently erased.
Research published by USENIX Advanced Computing Systems Association demonstrates how aggressive automated repairs frequently strip orphan data blocks instead of preserving user files.
Reject any automatic drive repair prompts until you have run a read-only data extraction program first.
Swapping the Card Across Incompatible Operating Systems
When a memory card stops showing photos on one machine, people often insert it into every device in the house.
They push the card into smart televisions, gaming consoles, tablet adapters, and different laptops.
Each device runs its own operating system with unique indexing and background metadata policies.
Smart TVs and mobile devices often write hidden indexing files the instant a removable drive connects.
These unwanted background writes risk overwriting the fragile sectors where your missing photos reside.
Keep your diagnostic steps focused on a single stable computer using a dedicated, high-quality card reader.
If your files vanished after a partition issue, you can try sd card deleted photos recovery without formatting the safe guide.
Physical Abuse: The Hairdryer and Freezer Myths
Internet forums sometimes recommend absurd physical remedies for unreadable cards, like baking them with a hairdryer or freezing them in a plastic bag.
Extreme temperature swings are terrible for micro-soldered electronics and NAND flash silicon.
Freezing an SD card creates internal condensation when brought back into warm air, causing electrical short circuits across contact pads.
Excessive heat softens the plastic housing, bends the pins, and degrades charge retention inside the memory cells.
SD cards must always be handled at stable, dry room temperatures.
If physical connection pins look dirty, wipe them gently with a dry microfiber cloth and nothing else.
An Action Plan for Recovering Missing Memories
Losing track of your photos is a stressful hurdle, but it is rarely the end of the story.
Now that you understand that deletion simply removes index entries, you can handle missing files calmly and strategically.
Storage devices follow strict logical rules, and approaching them with patience gives you the best chance of saving your media.
Immediate Action Checklist When Files Disappear
-
Halt all write operations: Turn off the host camera or phone and pull the card immediately.
-
Engage the mechanical lock: Slide the plastic write-protect switch down to lock the card against unexpected writes.
-
Use an external card reader: Avoid direct cable connections from camera to computer; dedicated USB readers offer cleaner communication.
-
Run read-only recovery software: Use trusted programs that scan the raw sectors without altering the card's file table.
-
Save files to an isolated drive: Store any recovered photos on your computer's internal drive, never back onto the SD card.
Once your photos are safe on your computer, you can securely refresh the card using camera formatting and return it to your rotation.
Taking proper precautions today means a single misclick will never destroy your hard-earned memories again.
When you are ready to actually get the photos back, my complete guide to recovering deleted photos from an SD card walks you through the whole process step by step.
Common Inquiries Regarding Vanished SD Card Photos
Why did my photos disappear without me pressing delete?
Spontaneous data loss usually indicates file system corruption caused by pulling the card out while it was writing, or a dying camera battery during a save cycle. The physical data remains in the flash cells, but the index table broke, making files invisible to your viewer.
Does a quick format permanently wipe my pictures?
A quick format only clears and rebuilds the directory tree, leaving the actual underlying image data untouched across the storage sectors. As long as you do not write new files over that space, recovery tools can scan the raw memory blocks and rebuild your images.
Can an SD card's write-protect switch stop files from disappearing?
The physical write-protect switch on full-sized SD cards prevents the host device from writing, modifying, or deleting index entries and storage sectors. Engaging this switch guarantees that connected computers cannot erase pictures or overwrite unallocated space while you troubleshoot.
Why do some recovered photos look broken or split in half?
This happens when file fragmentation occurs or when wear leveling splits a single photo across multiple non-contiguous memory blocks. If the recovery program cannot locate every sequential data block, it can only render the top portion of the image.
Reader Safety and Content Disclaimer
This guide is provided for educational and informational purposes only. While the methods described reflect standard industry data recovery practices, storage media behavior varies depending on wear, controller firmware, physical condition, and file system integrity. The author and publisher accept no liability for any data loss, hardware damage, or software errors resulting from the use or misuse of the information presented in this guide. Always back up valuable files across multiple distinct platforms, and consult a qualified hardware data recovery specialist if you suspect physical chip degradation.